
Introduction: The History, Quality, and Services of DIEFFEMATIC
Founded with a clear and innovative vision, Dieffematic is an Italian company specializing in the production and sale of home and industrial automation systems. Established over 30 years ago, this company has managed to transform and constantly adapt to the needs of an ever-evolving market, becoming a reference point in the field of automation today.
The History of Dieffematic: From Pioneer to Innovator
From the beginning, Dieffematic has based its success on strong innovative capabilities and a continuous pursuit of quality. Key moments in its history include the introduction of revolutionary products in the entrance automation field, marking a significant distance from the competition. In the past ten years, the company has further expanded its audience through its own e-commerce, making automation accessible not only to specialized technicians but also to private consumers.
Quality: A Constant Commitment to Excellence
Dieffematic stands out for the high quality of its products, which ensure excellent performance even in the most extreme conditions, complying with the highest safety standards in the sector. This dedication to quality is made possible by a team of highly qualified experts who are always up-to-date with new technologies. Each product is rigorously made in Italy, adding another level of reliability and prestige.
Offered Services: Beyond the Product
The company offers a wide range of services designed to meet the diverse needs of customers. From purchase support to installation and after-sales assistance, Dieffematic guarantees a complete and professional service. Additionally, it produces video tutorials to illustrate the use of its products, making the entire automation process more straightforward and safe for consumers.
Another strong point is the free technical and commercial assistance service, which allows customers to receive qualified and timely support, increasing their satisfaction and loyalty to the company.
With a physical presence in the territory that includes a store, a production and logistics center, as well as an operational headquarters for administration and assistance, Dieffematic is able to offer customized and cutting-edge solutions, making it the ideal partner for both companies and private consumers.
Find out more about the wide range of products and services offered by Dieffematic by visiting our website: Dieffematic.
Discover the Automation Solutions for Awnings and Shutters
In an increasingly connected world, automation solutions for awnings and shutters offer an incredible opportunity to make your home or business more functional and innovative. If you are wondering how to automate awnings or looking for the best motors for awnings and shutters, you are in the right place. Discover how our products can take comfort and convenience to a new level.
Range of Available Products
Our motors for awnings and shutters are designed to fit different sizes and needs. We offer a wide range of motors, including:
- Motors for awnings from 10 Nm to 120 Nm: Depending on the size of your awning, you can choose the most suitable motor. For example, a 50 Nm motor like the one in our Awning Motor Kit can lift up to 100 kg, thanks also to the presence of the emergency manual operation.
- Motors for shutters from 20 kg to 230 kg: The choice of shutter motor depends on the actual weight of the shutter. For example, if a shutter weighs 30 kg, a motor that can handle at least 60 kg is required to ensure safe and uninterrupted operation. For motors over 50 Nm, it is recommended to use oval and 78 mm axles.
Main Features
- Emergency Release: Our motors for awnings are equipped with an emergency release, a safety measure that allows manual movement in case of a power outage.
- Power Variety: The motors range from 10 Nm to 120 Nm, with the capacity to lift weights from 20 kg up to 230 kg. This wide range ensures that every need, from the most common to the most specific, is met.
- Precise Calculations: It is essential to make a precise calculation of the shutter's weight, considering doubling the actual weight to choose the appropriate motor, given the absence of mechanical traction springs.
Want to know more about how to automate your awnings? Discover the Awning Motor Kit and make your home a more comfortable and safe place. We also have smart home solutions that include apps to automate awnings and WiFi solutions for awnings, making integration with your home system even more accessible.
Your experience of comfort and safety starts here. Visit our site and discover all the available automation solutions to transform your home with ease and style.
Our Solutions
Transform Your Awning with the Professional Motor Kit: Innovation, Reliability, and Simplicity in One Product
Discover the Awning Motor Kit, the perfect solution to automate and improve the efficiency of your awning. With advanced features and a meticulously designed layout, this kit is designed to offer maximum convenience and durability.
Product Overview
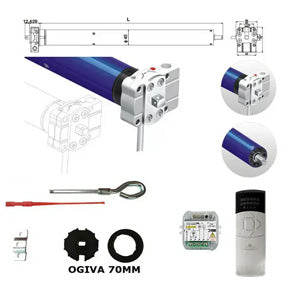
Product Name: Awning Motor Kit
The Awning Motor Kit transforms the daily use of your awning into a simple and effortless activity. Thanks to advanced technological solutions and impeccable design, the kit offers convenience and reliability, making life easier for its users.
Main Features
- Emergency Manual Operation: In case of unexpected events, the kit includes an emergency manual operation system to ensure safety and functionality.
- High Capacity: With a maximum capacity of 100 kg, it is ideal for large awnings, ensuring optimal performance.
- Actuator with Mechanical End Stop: The high-precision and reliable mechanical end stop allows perfect control of the awning's opening and closing.
- Compact Design: The motor head is designed with attention to detail to minimize bulk, making it possible to install even in tight spaces.
- Innovative "Easy CLAP" Mounting System: Installing the motor has never been so easy. Thanks to the innovative hook system, a simple click is enough to fix the support to the motor head.
- Versatility: A wide range of adapters, accessories, and supports are included to meet every installation need.
User Benefits
- Easy Installation: Whether you're a professional or a DIY enthusiast, installing the Awning Motor Kit is incredibly simple and quick. With the "Easy CLAP" system, you save time and effort.
- Efficient and Reliable: The professional tubular motor offers stable and long-lasting performance, perfect for daily use.
- Maximum Security: The emergency manual operation and robust design ensure that your awning operates safely even in unforeseen situations.
- Compatibility: Before purchase, make sure to check the roller's diameter, which must be 70mm or 78mm. For a 60mm roller, you will need to replace it with a 70mm OGIVA version, which is included in the packaging.
Technical Specifications
- Rectangular Bracket and 70 mm OGIVA Adapter included in the package
- Mechanical End Stop in Opening and Closing:
- Power Supply: 230 Vac
- Torque: 50nm
- Rotations per Minute: 12 rpm
- Number of End Stop Turns: 26
- Thermal Protection Time: 4 min
- Power Consumption: 232W
- Current Consumption: 1.1 A
- Motor Length: 57 cm
- Weight: 4.5 kg
With these cutting-edge technical specifications, the Awning Motor Kit promises to make life easier for its users, making every interaction with their awning a smooth and pleasant experience.
Don't wait any longer, discover all the potential of the Awning Motor Kit and revolutionize the comfort of your home or outdoor space!
Mechanical Installation
General Overview of Mechanical Installation
The installation of the awning motor is divided into several main phases:
- Preparation of tools and materials.
- Fixing the motor's OGIVA.
- Mounting the end stop.
- Adjusting the motor's rotation.
- Installing the emergency release.
- Final motor installation and operation check.
Installation Details
1. Preparation of Tools and Materials
Before starting, make sure you have all the necessary tools and materials:
- Allen wrenches
- Screwdrivers
- Awning motor
- Pins
- Slot and tube
2. Fixing the Motor's OGIVA
The motor comes with a 70 mm OGIVA, which must be fixed laterally with a pin:
- Slide the OGIVA into the motor at the location of the end stop.
- Ensure the OGIVA is off-center so that it does not touch the motor body.
- Secure the OGIVA to the motor with the pin.
3. Mounting the End Stop
The end stop allows you to set the opening and closing limits of the awning:
- Insert the traction block into the motor, as well as the end stop OGIVA block.
- Make sure the OGIVA is correctly seated in the motor.
4. Adjusting the Motor's Rotation
The motor has two adjustment screws to set the end stop's travel:
- Identify the two screws with arrows indicating the direction of rotation.
- The arrow does not indicate the awning's rise or descent but the direction of rotation:
- Turn the corresponding screw in the "+" direction to increase the travel.
- Turn it in the "-" direction to reduce the travel.
- Repeat the procedure for the other screw to set the reverse rotation.
5. Installing the Emergency Release
The emergency release allows you to move the awning in the absence of power:
- Insert the eyelet into the emergency release in the hole provided in the motor.
- Secure the eyelet with a lock nut.
- In case of a power failure, use the release to manually move the awning.
6. Final Motor Installation and Operation Check
The final phase involves fixing the motor to the classic mounting bracket:
- Insert the motor hub into the dedicated point in the bracket.
- Secure the motor with a side screw to the awning's mechanism.
For more details or further insights into each of these steps, you can consult the mechanical installation manual.
In conclusion, a well-done installation ensures maximum efficiency and durability of the awning motor. Follow each step carefully and consult the technical manual to clear up any doubts. Good work!
Electronic Installation
General Overview of Electronic Installation
Installing the electronic control unit for the awning motors involves several crucial steps, from basic connections to detailed sensor configuration. We will follow the process starting from the basic electrical connections, then move on to sensor integration, and finally to configuring the system via dip switches.
Main Installation Steps
- Connecting the Motor and Line Voltage
- Connecting the 220V Power Supply
- Connecting Single-Phase Motors
- Specific Details about Terminals
- Configuring Wired Commands
- Details on the Up and Down Terminals
- Correct Connections and Precautions
- Integrating Weather Sensors
- Wind, Sun, and Rain Sensor Connections
- 12V Sensor Power Supply
- Trimmer Settings
- Configuring Dip Switches
- Details on Dip Switches and Their Functions
- Settings and Customizations
- Configuring the Remote Control
- Presetting and Functions of the Remote Control
Step 1: Connecting the Motor and Line Voltage
Connecting the 220V Power Supply
To start the installation, connect the line voltage to the control unit's terminals. The 220V voltage must be connected to the first two terminals, which will provide the necessary power to the system:
- Terminals 1-2: 220V Line Voltage
Connecting Single-Phase Motors
The control unit manages two single-phase motors, each 230V with an onboard capacitor:
- Motor 1:
- Common in the center
- Opening phase
- Closing phase
- Motor 2:
- Common in the center
- Opening phase
- Closing phase
Step 2: Configuring Wired Commands
Details on the Up and Down Terminals
Configuring wired commands is critical for precise motor control:
- Motor 1 Up
- Motor 1 Down
- Common
- Motor 2 Up
- Motor 2 Down
These contacts are normally open (NO) and must not pass voltage.
Step 3: Integrating Weather Sensors
Wind, Sun, and Rain Sensor Connections
Some sensors require a 12V power supply, provided through dedicated connections:
- Power Supply: +12V
- Rain Sensor: Dedicated connection
- Wind Sensor: Dedicated connection
- Sun Sensor: Dedicated connection
- Common
Trimmer Settings
The trimmers allow you to set recognition thresholds for the wind and sun sensors, ensuring an awning lock or release depending on weather conditions.
Step 4: Configuring Dip Switches
The dip switches provide an additional level of customization and configuration:
- Dip Switch 1: Excludes the sun sensor when in the ON position
- Dip Switch 2:
- OFF: Awning closes in the event of rain
- ON: Awning opens in the event of rain
- Dip Switch 3: Manages awning reopening after wind sensor intervention
- Dip Switch 4: Manages motor tests with long or normal times
Step 5: Configuring the Remote Control
Presetting and Functions of the Remote Control
The remote control provided with the control unit is pre-set for convenience:
- Channel 1: Motor 1 Control
- Channel 2: Motor 2 Control
Conclusions
Once all these steps have been correctly followed, you will have a properly installed and programmed control unit, ready to efficiently manage your awning motors and integrated weather sensors. For more details or further insights, we invite you to consult the electronic installation manual.
Thanks for following our tutorial!
