
The Story of Dieffematic: A Journey of Innovation and Quality
Founded over 30 years ago, Dieffematic has become a benchmark in the world of home and industrial automation. From the very beginning, the mission was clear – to make automation technology accessible and of high quality. The company skillfully combined innovation with traditional Italian craftsmanship. Over the last 10 years, with the launch of their own e-commerce site, Dieffematic revolutionized the industry, making it easy for consumers to access automated solutions that were once exclusive to professionals.
Uncompromising Quality in Automation Solutions
When it comes to quality, Dieffematic makes no compromises. The products offered are the result of meticulous design phases, rigorous testing, and constant updates to the latest technologies. This dedication results in automations that not only excel in performance but also guarantee safety and reliability, even under the most extreme conditions. Each solution is customizable to meet the specific needs of both businesses and individuals, making Dieffematic the ideal partner for those seeking excellence in automation.
Comprehensive Services for Every Need
Dieffematic offers a full range of services designed to support customers at every stage of the process, from purchase to after-sales:
- Innovative E-commerce: Allows users to easily explore and purchase a wide range of automated products.
- Technical and Commercial Support: A team of experts is always available to assist customers, ensuring pre-sales and post-sales support.
- Customizable Solutions: Each customer can obtain tailored automated solutions, designed to meet specific needs.
- Physical Store and Production Center: In addition to the operational headquarters that house administration and support, Dieffematic maintains a tangible point of contact with customers through a physical store and a logistics center.
Dieffematic's continuous commitment to providing cutting-edge solutions is reflected in every aspect of its operations, making it a trusted choice for anyone seeking reliable and high-quality automation. From video tutorials to other educational resources, the company also strives to make technology accessible and understandable for everyone, simplifying the lives of its customers.
Find out more about how Dieffematic can revolutionize your approach to automation by visiting their official website.
Discover Innovation in Roller Shutter Automation: Power and Precision at Your Service
In an era of convenience and advanced technology, automating home shutters is not just a trend, but a necessity for those who want to improve the comfort and safety of their homes. Let's explore the range of solutions offered in the world of roller shutter automation, highlighting the unique features and benefits that make these systems indispensable.
Roller Shutter Motors: Versatility for Every Need
The key to a perfect installation of automatic shutters in your home lies in choosing the right motor. Depending on the size and weight of the shutter, the motors must be carefully selected. This is particularly important when dealing with large window shutters, where the motor's power makes all the difference.
Motors for Curtains and Shutters: For shutters, unlike curtains, the emergency release can be optional. However, its presence can be crucial in specific situations.
Power Range: We offer motors that range from 10 Nm to 120 Nm, to cater to needs from 20 kg up to 230 kg. For heavy shutters, once over 50 Nm, using adaptors and axles of 78 mm is recommended to ensure stability and optimal operation.
Find out more about our range of motors here: Roller Shutter Motor Kit.
Shutter Automation: Comfort and Control at Your Fingertips
These motors are not only powerful but also smart. Our roller shutter automation solutions with remote control offer the utmost comfort, allowing you to control your shutters with a simple click. Want something even more advanced? Compatibility with home automation systems allows perfect integration with other smart home solutions, giving you total control and tailored customization.
Smart Systems: Roller shutter automation with a smart system not only simplifies control but also helps reduce energy consumption by optimizing the use of natural light and ensuring effective thermal insulation.
Wireless Operation: Wireless shutter automation eliminates the need for costly and invasive wiring interventions, allowing for easy installation even for DIY enthusiasts.
Security and Maintenance: Protect Your Home with Ease
Another great advantage of automatic shutters is their ability to enhance home security. With automated closure systems, you can schedule openings and closings based on timings, thus deterring potential intrusions.
Simple Maintenance: Automatic shutters are designed for long life and minimal maintenance, adding further value and convenience to your investment.
A Future of Comfort and Security
Investing in shutter automation means choosing a more comfortable, safe, and efficient lifestyle. Whether you are considering automating existing shutters or installing a new system, our variety of products ensures efficient solutions adaptable to any need.
Discover our offers and customization possibilities by consulting our product range here: Roller Shutter Motor Kit.
Start transforming your home today with the best solutions for shutter automation and enjoy the utmost comfort and technology at your fingertips.
Our Solutions:
Discover the Power and Efficiency of the Roller Shutter Motor Kit
Imagine being able to control your roller shutters with ease and precision, enjoying unprecedented comfort and total security. Welcome to the future of home automation with our outstanding Roller Shutter Motor Kit.
Product Overview
The Roller Shutter Motor Kit is designed for those looking for a mix of power, reliability, and ease of installation. Equipped with a 50 Nm motor, this kit can support shutters up to a maximum of 100 kg, making it ideal for a wide range of residential and commercial applications.
Main Features
- Professional Tubular Motor: With an actuator equipped with a mechanical end stop, the motor guarantees high-quality performance and long life.
- Maximum Capacity 100 Kg: This kit can easily lift heavy roller shutters.
- Control Unit with Box and Receiver: The control unit, made with an ABS casing, is equipped with a radio receiver for remotes, offering intuitive and immediate control.
- 6-Channel Remote Control: Allows precise management of multiple shutters with a single device. The selection display and up/down buttons make the use extremely easy and practical.
Specific Benefits for Users
- Easy Installation: Thanks to the innovative coupling system, motor mounting is extremely quick and hassle-free. A simple click is all it takes to secure the support to the motor head.
- Space Saving: The compact design of the motor head allows installation even in tight spaces, without compromising functionality.
- Reliability and Long Life: The robust construction and quality materials ensure long life and impeccable operation over time, minimizing the need for maintenance.
- Flexibility and Customization: The kit includes a wide range of adapters, accessories, and supports, allowing any specific installation need to be met.
Motor Technical Specifications
- Torque: 50 Nm
- RPM: 12
- End Stop Turns: 26
- Thermal Time: 4 minutes
- Power Consumption: 232W
- Current Consumption: 1.20 A
- Motor Length: 57 cm
- Motor Weight: 3.9 kg
- Power Supply: 230 Vac
Control Unit
- Material: ABS Casing
- Function: Radio receiver for remotes
- Connection: Ability to connect a single button with step-by-step functionality
- Power Supply: 230V
6-Channel Remote Control
- Functions: Shutter selection button, Selection display, Up and down command
Important Warnings:
It is important to note that a 50 kg motor cannot lift a 50 kg shutter due to friction and inertia. We recommend using a higher power motor to ensure optimal operation. For example, for a 35 kg shutter, it is preferable to use a 70 kg motor to ensure maximum reliability and long life.
Mechanical Installation
General Overview of Mechanical Installation
Installing a roller shutter motor requires careful preparation and the use of appropriate tools. Here is an overview of the main steps:
- Preparation of the roller and motor
- Insertion of the motor into the roller
- Fixing the motor and adjusting the end stop
- Locking the motor and final check
Preparation: Necessary Tools and Materials
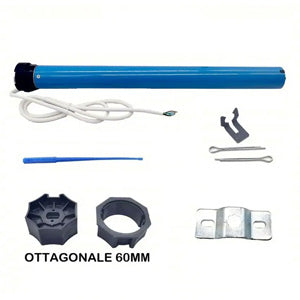
Before starting the installation, ensure you have the following tools and materials:
- Roller shutter motor
- Octagonal adapter
- Locking bracket
- Adjustment key
- Fixing screws
- Drill with a suitable bit
Preparing the Roller and Motor
Octagonal Roller Adaption: The roller will have a coincidence groove for motor insertion. Ensure the roller is compatible with the provided octagonal adapter.
Inserting the Motor
Before inserting the motor into the roller, ensure the cotter pin is well secured to keep the structure stable.
Insert the motor into the roller and ensure the octagonal adapter is correctly aligned.
Fixing the Motor
- Use the bracket to lock the motor onto the side plane.
- Ensure the cotter pin is securely fastened.
End Stop Adjustment
The octagonal end stop must be well inserted within the rotation itself. Arrows on the end stop indicate the direction of the octagon rotation and not necessarily the direction of movement (up and down). Here's how to proceed:
- If the arrow points towards you, the rotation will be counterclockwise.
- Turn the adjustment key towards the plus (+) to increase the range in that direction.
- Turn the adjustment key towards the minus (-) to decrease the range in that direction.
Locking the Motor
Grooves in the Tube: Most tubes have grooves used for motor fixing. These grooves serve to:
- Insert a screw corresponding to the height of the octagonal lock.
- Fix the motor by integrating it into the instrument's body using a screw.
Fixing Screws
Inserting the Fixing Screw: For tubes with particularly heavy shutters, it may be necessary to insert a screw for further motor fixing.
After inserting the octagon, secure it with a screw corresponding to the plastic octagonal lock.
Final Check
After completing the installation, ensure that:
- All components are securely fixed.
- The end stop adjustments are correct.
- The motor operates correctly without anomalies.
For further details or insights, please refer to the mechanical installation manual available at this link.
Thank you for following this tutorial. An accurate installation is key to ensuring reliable and long-lasting operation of your roller shutter motor. Good work!
Control Unit Programming
General Overview of Electronic Installation
The installation of the electronic control unit includes several distinct steps that we will address point by point:
- Connecting the line voltage
- Connecting the motors
- Connecting wired controls
- Connecting weather sensors (wind, sun, rain)
- Programming the dip switches
- Setting the sensitivity trimmers
- Configuring the remote control
1. Connecting the Line Voltage
Connecting 220V to the Control Unit
Identify the first two terminals of the control unit.
Connect the line voltage cables to these terminals.
Ensure the connection is tight and secure to avoid short circuits.
2. Connecting the Motors
Motor Connection Specifications
The control unit can manage two single-phase 230 volts motors, each with an integrated capacitor.
Motor 1: Connect the opening phase and the closing phase to the dedicated terminals. The common wire should be connected to the central terminal.
Motor 2: Similarly, connect the opening and closing phases to the respective terminals, with the common wire in the center.
Connection Diagram
- Motor 1:
- Central terminal: Common
- Left side: Opening phase
- Right side: Closing phase
- Motor 2:
- Central terminal: Common
- Left side: Opening phase
- Right side: Closing phase
3. Connecting the Wired Controls
Wiring the Control Terminals
Connect the wired terminals to the dedicated points:
- Motor 1 up
- Motor 1 down
- Common
- Motor 2 up
- Motor 2 down
Remember: These contacts are normally open (NA) and should never be under voltage.
4. Connecting the Weather Sensors
Sensor Types and Connections
Some sensors require power:
- Find the +12 volts for supply.
- Connect the sensors as follows:
- Rain sensor: Specific rain terminal and common.
- Wind sensor: Specific wind terminal.
- Sun sensor: Specific sun terminal.
5. Programming the Dip Switches
Setting the Dip Switches
The four dip switches offer the ability to customize the control unit's behavior:
- Dip 1: Sun sensor exclusion
- Dip 2: Canopy management in case of rain (closure/opening)
- Dip 3: Reopening after wind sensor intervention
- Dip 4: Motor test management (long times/normal times)
6. Setting the Sensitivity Trimmers
Calibrating the Trimmers
Two trimmers allow you to adjust the recognition threshold for wind and sun, ensuring precise response to weather conditions.
7. Configuring the Remote Control
Using the Remote Control
The supplied remote control is pre-configured:
- Channel 1: Controls motor 1
- Channel 2: Controls motor 2
Conclusions
Properly following all these steps, you will have a properly installed and programmed control unit, ready to efficiently manage the motors of your awnings and integrated weather sensors. For further details or insights, please refer to the electronic installation manual.
Thanks for following our tutorial!
